

There are an infinite number of robotic welding cell setups for all different kinds of jobs. In truth, there aren’t many that are exactly alike. And that’s because there are so many different welding automation needs out there for parts and products that need to be welded.
But most all of these robotic welding cells do have one thing in common: most all of them could benefit from a little improvement in their cell performance. Sometimes it’s just little things that can make programming easier or maintenance friendlier or parts longer lasting. Other times it’s adding additional periphery to cut down on costs long term or boosting uptime.
Everyone has some issue with their robotic weld cell in some way, shape, or form. I’ve never seen one that couldn’t use some kind of improvement – even a small one. With that in mind these 6 items or practices are simple and direct ways to improve your robotic welding torch performance, with a couple best practices sprinkled in there for really maximizing the value out of each:
-
Robotic Torch Nozzle Cleaner or Reamer
-
Using the Correct Robotic Torch Cable Length
-
Choosing the Right Robot Torch Package for the Job
-
Robotic Fume Extraction
-
Shielding Gas Management
-
Tool Center Point Tools
With those in mind, here's a deeper dive into how these efficiency gaining tools and practices get your robotic welding operation to a higher level of productivity.
Robotic Torch Nozzle Cleaner or Reamer
The best way to improve your robotic welding cell – really in any way – is to improve or invest in more automation because that’s why you incorporated this into your facility it the first place, automation and less downtime. These cleaning stations can:
- Nozzle Ream
- Nozzle Ream and Inject Anti-spatter
- Nozzle Ream, Inject Anti-spatter, and Wire Cut
This allows your robotic cell to maintain a clean nozzle, ensure the robot cell has a nozzle that’s treated, and cuts the wire to the same length every time so you get both the reliable Tool Center Point (TCP) and maintain good arc starts every time.
But say you’re not willing to invest that much more automation into your robot weld cell. If you had to choose which feature is most essential in order, the nozzle reaming is the way to go, then the wire-cutting.
When you have a reaming station, one thing to note is that it’s ideal to have air blast engaged from the back end of the torch down to the diffuser ports while you are reaming. Air blast lets you blow out any spatter or debris through the diffuser back out the nozzle. That keeps the blade from pushing spatter or other debris back into the gas ports and reduces gas flow issues which can cause problems.
Reaming Station
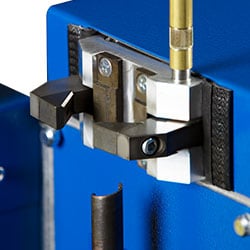 With a nozzle reaming station you have a couple options for the nozzle clamping, and these options are based on the number of clamping points on the nozzle. Generally speaking, more clamping points means more security. So, a 4-point clamping system (pictured) is the ideal way in which to secure the robotic torch nozzle. That’s not to say a 3-point clamp style isn’t effective, but with 4-points it’s going to give you more surface area of clamping which ensures you keep that nozzle clamped tight and consistent so the reamer blade travels consistently inside the nozzle. This increases the torch nozzle and reamer blade life span.
Another thing with nozzle reamer stations is to make sure you pair up your reamer blade with your nozzle. It’s something that’s very specific to the nozzle you’re welding with. While one reamer blade will usually fit a wide variety of welding nozzles it’s critical that they are matched up, otherwise it won’t work as efficiently as it should.
Anti-spatter Solutions
Another thing to note is that if you do have an anti-spatter injector it’s important to keep the area as clean as possible. Check and adjust your injector to make sure you’re not over-injecting anti-spatter. Over-injection of anti-spatter fluid creates a mess and wastes it. Things like dust and spatter more easily stick to anti-spatter fluid, which makes the work area more difficult to maintain and work properly.
We recommend water-based over oil-based anti-spatter because it keeps things cleaner. Oil-based works as well when it comes to performance because the thicker coating will last longer, but it does tend to collect dust and makes keeping the cell clean more involved. However, in situations that require eco-friendlier anti-spatter or those who work in very cold environments where water-based can potentially freeze, an oil-based anti-spatter would be the way to go.
For the nozzle reamer, another thing that I always recommend that provides a longer life to that reamer blade is to lubricate the reamer blade. Think of it like a drill bit. To lubricate your reamer blade in a torch cleaning station:
- Go to the anti-spatter injector and apply anti-spatter
- Go to the reaming station and ream inside the nozzle
- Allow the anti-spatter to cool and lubricate the nozzle
- Go back to the anti-spatter injector again to apply anti-spatter
- Use the wire cutting station and cut the wire to length
This lets the first application of anti-spatter work to lubricate the reamer blade itself, while the second dosing of anti-spatter fluid give the nozzle protection from spatter. Overall, anti-spatter is less expensive and time-consuming to replace than the reaming blade, so ensuring it’s prepped for a long service life can go a long way to improving robotic welding performance.
Getting the Robotic Torch Cable Length Right
Another thing that can improve a robotic weld cell performance on a consistent basis is using a cable with the correct length. There are so many robotic weld cells using more cable that is longer than is necessary for their application. Extra cable length ends up slack across the arm of the robot, and that contributes to liner wear, cable abrasion, and getting the cable caught on fixturing or the part itself.
A longer than necessary cable poses unnecessary challenges, and puts a lot of strain or stress on the joints of the robot like the back end of the neck or the interface. The same risks apply with a robotic torch cable that is too short. A cable that is too short will pull on the connection points when the cable is experiencing tension, and this can increase resistance or decrease current capacity, or cause water leaks if it’s a water-cooled setup.
 Be aware of what your robotic welding torch reach capabilities are and what you need to have for that cell and make your cable length match. If you have a cable length that is too long, cut it down. If you have one that’s too short, run it through a repair program with your robotic welding product OEM and get it lengthened to better suit your process. If cases where you have an externally mounted feeder, a lot of manufacturers use tool balancers, which are essentially a cable or hanger that runs off a spring and keeps tension on the part or cable assembly to manage it.
For cable types – such as performance cables or value cables – a lot of that will depend on your budget. A Value Cable, for instance, is something not designed to be rebuilt or have a lot of high-performance life out of it. A more basic design at less cost upfront, and typically less cable life than a ‘Performance cable’. A Performance cable compared to a Value cable is designed to have additional protection for the outer house covering. This makes it more abrasion resistant and more torsion resistant, which gives it greater durability over the long term.
For water-cooled setups, you can typically choose between standard Power Water cables and Hybrid cables. A Hybrid cable is essentially an air-cooled cable system with water lines that run straight to the neck of the welding torch. In practice then, you use coolant to cool the neck and consumables while still using an air-cooled power cable system. This is used as a lower cost alternative due to the lower labor and material cost to build. The biggest downfall to these types of Hybrid cables is that they are not as repairable and carry more weight because you need more copper to dissipate the heat and carry the current.
Conversely, a 100% water-cooled cable assembly runs coolant lines run throughout the torch cable, and up through the neck to cool the neck and the consumables. This keeps heat out of that cable so you don’t need as much copper mass to dissipate the heat or the carry that current, and that cable stays cooler and is built lighter and a little more flexible while also being more easily repairable and longer lasting.
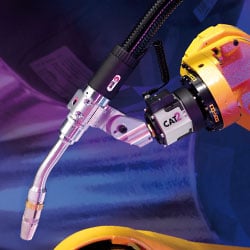
Choosing the Right Robot Torch Package for the Job
The right torch package for the job applies to the consumable and periphery setup. If your robotic welding cell is running 3 shifts a day at 6 days a week, your high output robotic cell shouldn’t be running on a Value cable cable and a 3-point clamping reamer without anti-spatter or a wire cutter. If you’re really trying to increase throughput and decrease downtime you should be looking to make the proper automation investment and not cut costs on the parts that matter – namely the torch and the tools around the torch that keep it running all day with little maintenance required.
It’s okay to look for value options if you’re running an application running a few hours a day or a few hours a week or for a specific part. You likewise don’t need a 600-amp torch setup with a quick change and a 4-point clamping system on a cleaning station with heavy duty plated contact tips; you can go a lower cost route. Look at things from the level of automation you’re wanting to do. Take into count the kind of parts being welded, the cycle time of that weldment, and the duty cycle you’re looking at.
All these factors need to be taken to account when evaluating how you should setup your tool to perform your work. With robotic welding there are almost endless options at your disposal, so knowing your specific needs will help your OEM dial-in the right solution for you.
Robotic Fume Extraction
An emerging topic with robotic welding that is becoming more in demand is fume extraction. And for good reason. A lot of recent research has pointed to exposure to welding fumes as a carcinogenic, an exposure over a long period of time can increase health and safety risks for those exposed. With those safety and health risks combined with the ability to use an overhead crane to get into these cells for parts, it isn’t always feasible to use an overhead hood style fume extraction setup in your welding cell, especially when you have big parts and you’re trying to move them into a position with a crane.
This makes source capture fume extraction ideal. Robotic fume extraction at the source means you can get bigger parts into the cell and into the fixturing. Other options are hood style systems which typically use a big vent hood. It’s expensive compared to extracting at the source and it can be inconvenient for manufacturers who need to lower parts into their cells and lift them out. This means you have to use small parts that workers can manually lift it out or can be accessed with a small forklift.
Source Capture Robotic Fume Extraction Video Example
Central systems are another option. Once smoke gets up to the ceiling and caught into the central area where you manipulate smoke to collect and exhaust it out of the building, but even then, it still has a path to travel that exposes employees around the shop to welding smoke and dust, even when the smoke itself isn’t visible. Metal particles from welding are heavy and don’t always rise up with the smoke.
When welding together very large parts like dump truck beds, frames, trailers, etc., these parts typically need to be put in place with a crane, a hood style system is not going to work, and a more direct manner of fume extraction will be necessary to properly collect and rid the work area of welding fumes necessary.
When you consider parts like these, typically they are using thicker wire, a water-cooled setup, and using higher deposition rates to ensure a quality weld, that’s a lot of weld smoke not being captured in a work area and a lot of workers being exposed to metallic particles within the work environment. Getting that at the source before any exposure is at risk is the best way to go.
Shielding Gas Management
Another way to improve efficiency is gas management. Looking to electronic regulators instead of flow meters or mechanical regulators is a great way to improve and make more efficient use of your shielding gas. Unlike mechanical flow meters, Electronic Welding Regulators monitor welding amperage, gas pressures both in and out, make adjustments to gas flow dependent on welding amperage, and maintains flow rates even though incoming pressure may fluctuate depending on demand is from other weld cells.
If you’re at the end of a gas line and all the cells are drawing off that gas, your pressure may change as opposed to if you’re the only cell drawing off that gas line and welding. Electronic regulation – no matter what that pressure – is still going to delivery that programmed flow rate so long as you’re within the spec of the device. Flow meters are built off a of diaphragms and springs and has pressure changes so the output in turn will change.
So with gas management you are always delivery a consistent flow rate that can tie into an Ethernet system, open CAN Interface, or within the robotic controller. Notices and alarms are able to be set up so the cell can be shut down or an issue resolved and mitigated quickly, troubleshooted, and go back to production quickly.
With an everyday flow meter you’re not going to know there’s a problem until the part goes down the production line and you see there’s porosity in the part, or other gas related issue, and you check to find that there’s a blockage in the line. This means rework and wasted gas, plus scrap on the line. No flow meter will detect or alert for risks like those, whereas an electronic means of gas regulation can.
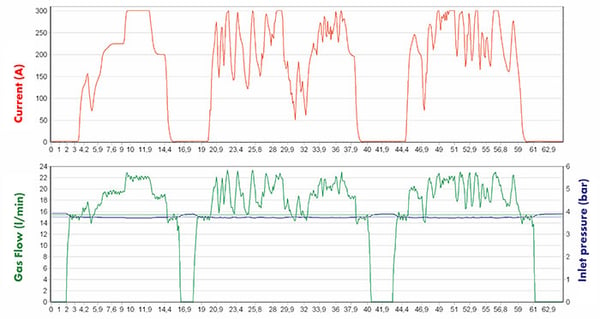
Electronic gas management also delivers more consistency in the gas delivery. If it’s not consistency, then its gas savings. By using electronic gas management as opposed to a diaphragm and spring style or a flow meter you can control that gas output very quickly and reduce the big surges of gas at the start of the weld. A lot of times you can hear that audibly. With electronic gas management, that is eliminated.
Electronic Gas Management (left) vs. Flow Meter (right)
The other way electronic gas management saves on cost is by controlling the gas used during post-flow or at the end of the weld. With electronic gas management it goes to zero immediately, whereas a flow meter you see the ball level out and slowly going down; while that ball is slowly going down it’s still flowing gas out of your nozzle. There’s no need for that gas and you’re just wasting it. That’s because it works off of pressure.
Tool Center Point Pointer
Other smaller hacks that are useful on the job site for robotic welding include using a TCP pointer. This is a simple, spring style point with a set length, a threaded fitting, and a spring pointer. Because it’s a spring, it has forgiveness so when you’re programming if you push the robot too far into part, instead of bending wire, the TCP pointer spring will just spring back into place and is straight.
With wire, you have to the pull the wire out, cut it, push wire back through, measure it, there’s more human error, and you lengthen your programming time unnecessarily. Using a TCP pointer saves a lot of time when you’re programming something new or doing touchups. They’re very inexpensive and a really good tool to keep in your pocket for when you’re needing to do programming.
Not all of these ways are going to be right for every robotic welding cell. For some maybe even just one of these is going to apply and increase performance and efficiency.
But if you can, take a good look at your welding cell performance and what it is giving you from a cost and production standpoint:
- Is it maximizing your return?
- Can it get faster?
- Do you have consistent results?
- Can it be more durable and high-performing?
With any one of these practices or solutions applied, you can likely realize your robotic cell has more productivity in it than it’s currently getting.
